Houdini tutorial
The Conductor submitter for Houdini is a Houdini Digital Asset (HDA) that allows you to ship renders (and other work) to Conductor from within the application.
This tutorial should get you going quickly. Please check the Houdini reference page for a detailed description.
If you haven't already done so, Download the Companion App.
Installation
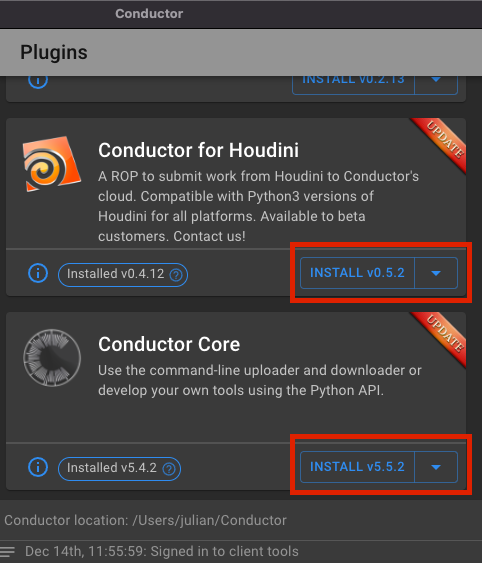
Open the Companion app on the Plugins page and install the Houdini plugin. At this time you should also install the Conductor Core package so that command line tools are available to you.
During installation, the plugin is registered with Houdini as a package. The package JSON file can be found in the following location.
~/Library/Preferences/houdini/<version>/packages/conductor.json
~/houdini<version>/packages/conductor.json
C:\Users\<username>\My Documents\houdini<version>
The plugin code itself is installed in a folder called Conductor in your home directory.
Prepare a submission
- Open or create a simple scene with a Mantra ROP.
- Go to the /out network panel and drop a Conductor node from the Farm submenu.
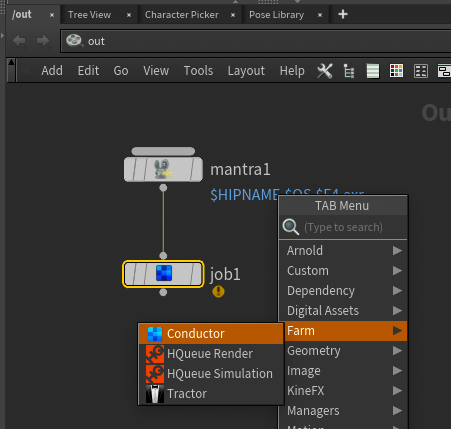
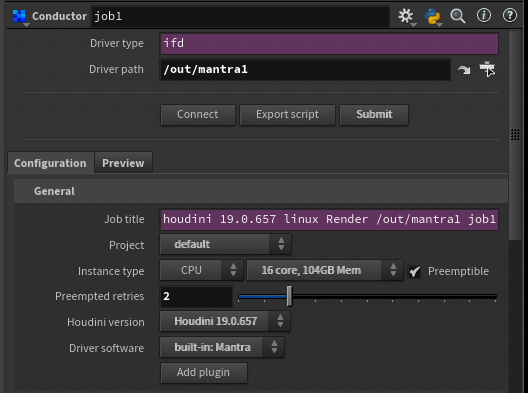
- Connect the Mantra ROP to the Conductor Job node and open up the parameter view. The Driver Type parameter should now display the ifd input.
- Hit the Connect button. This connects to your account on Conductor and you may be asked to sign in. It fetches the list of projects, packages, and instance types available to you. You'll notice the respective dropdown menus become populated.
Frame range
By default, the frame range is set to the range defined by the input driver ROP. You can change this to a custom range by checking the Override frame range checkbox and entering a frame spec manually. You can also set the Chunk Size to a value greater than 1 to submit multiple frames per task. However, since Conductor has an almost infinte number of machines at its disposal, it's usually best to leave Chunk Size at 1.
Scout frames is set to auto:3 by default. This means that 3 tasks, distributed evenly across the frame range, are started immediately and all the others are left in a holding state. The idea is to check the scout frames for errors and then unhold the rest of the frames if the scout frames look good.
Preview
You are almost ready to submit the job. But first lets check the raw submission payload. This is what Conductor will receive when you press the Submit button, and it's good practice to check it before submitting.
- Choose the Preview tab at the top of the Parameter window.
Notice how the all the parameters you set have been resolved. For example, you can see the job_title field, which appears on the Conductor dashboard, has been resolved to include the name of the scene file and renderer.
At the bottom of the preview, you can see the upload_paths field. This is a list of all the files that will be uploaded to Conductor. The scene file, and a few other files are included, however, if your objects have textures, they are not in the list. The asset scanning operation can be expensive, so if you want to check the full list of files to be uploaded, hit the Do asset scan button. Now the list of upload paths includes textures and other files.
Output path
The Output path field specifies a writable directory on the render nodes. We automatically derive this path from the input driver rop. If you haven't set up the driver to write to a valid folder, you might see "INVALID FILENAME IN /out/mantra1/vm_picture", or something similar. If so, go ahead and set the driver to write to a valid path.
Uploader
Notice in the Preview tab that the local_upload field is true. This means that the files will be uploaded to Conductor from your Houdini session, and you won't have control back until its complete. A better option is to have a daemon process take care of the upload, outside of Houdini. Then the submission will be much faster, and you'll be able to continue working in Houdini while the files are being uploaded.
- Go back to the Configuration tab and expand the Advanced section.
- Turn on the Use uploader daemon checkbox. If you were to go back to the Preview tab, you'd see that the local_upload field is now
false.
Submit
- Hit the Submit button. This will submit the job to Conductor. You'll see a window open up. If there are any warnings or errors, they will be displayed here. If everything is ok, press the Continue button and the job will be submitted.
At this stage, the payload has been sent to Conductor, but assets have not. To run the uploader daemon as mentioned:
- Open a terminal and run the following command:
conductor uploader
You should see progress lines written to the terminal. For more information on the upload daemon, see here.
Note
If you see a message saying "command not found" or similar, you may have forgotten to install the Conductor Core package. If you have installed the Core package, you may need to add the Conductor bin directory to your PATH variable. Locations of the bin directory are as follows:
~/Conductor/bin
~/Conductor/bin
C:\Users\<username>\Conductor\bin
Be sure to visit the Houdini reference page for more info.